Tried this design? Tag me on Instagram or Facebook using the hashtag #freehandmehndi

The official blog of Free Hand Mehndi YouTube Henna Guru. Homegrown Pacfic Northwest(Portland, Oregon)henna artist. Come explore all things henna and body art with me. Tutorials and inspiration galore! Get an insight into my passions and drive. I'm a culture and fashion junkie at heart. Aspiring girly girl and makeup artist. My mission is to connect, share and inspire.
Showing posts with label easy henna. Show all posts
Showing posts with label easy henna. Show all posts
Thursday, February 20, 2014
Fun Henna Motifs in Minutes
You can create a fun and detailed henna motif in just minutes. Quick motifs are great for festivals, henna parties, or henna beginner classes. I really enjoy creating these fun pieces. You can find several Indian style henna motifs in my new ebook Mehndi Mela including the design in the video below. Enjoy!


Sunday, December 29, 2013
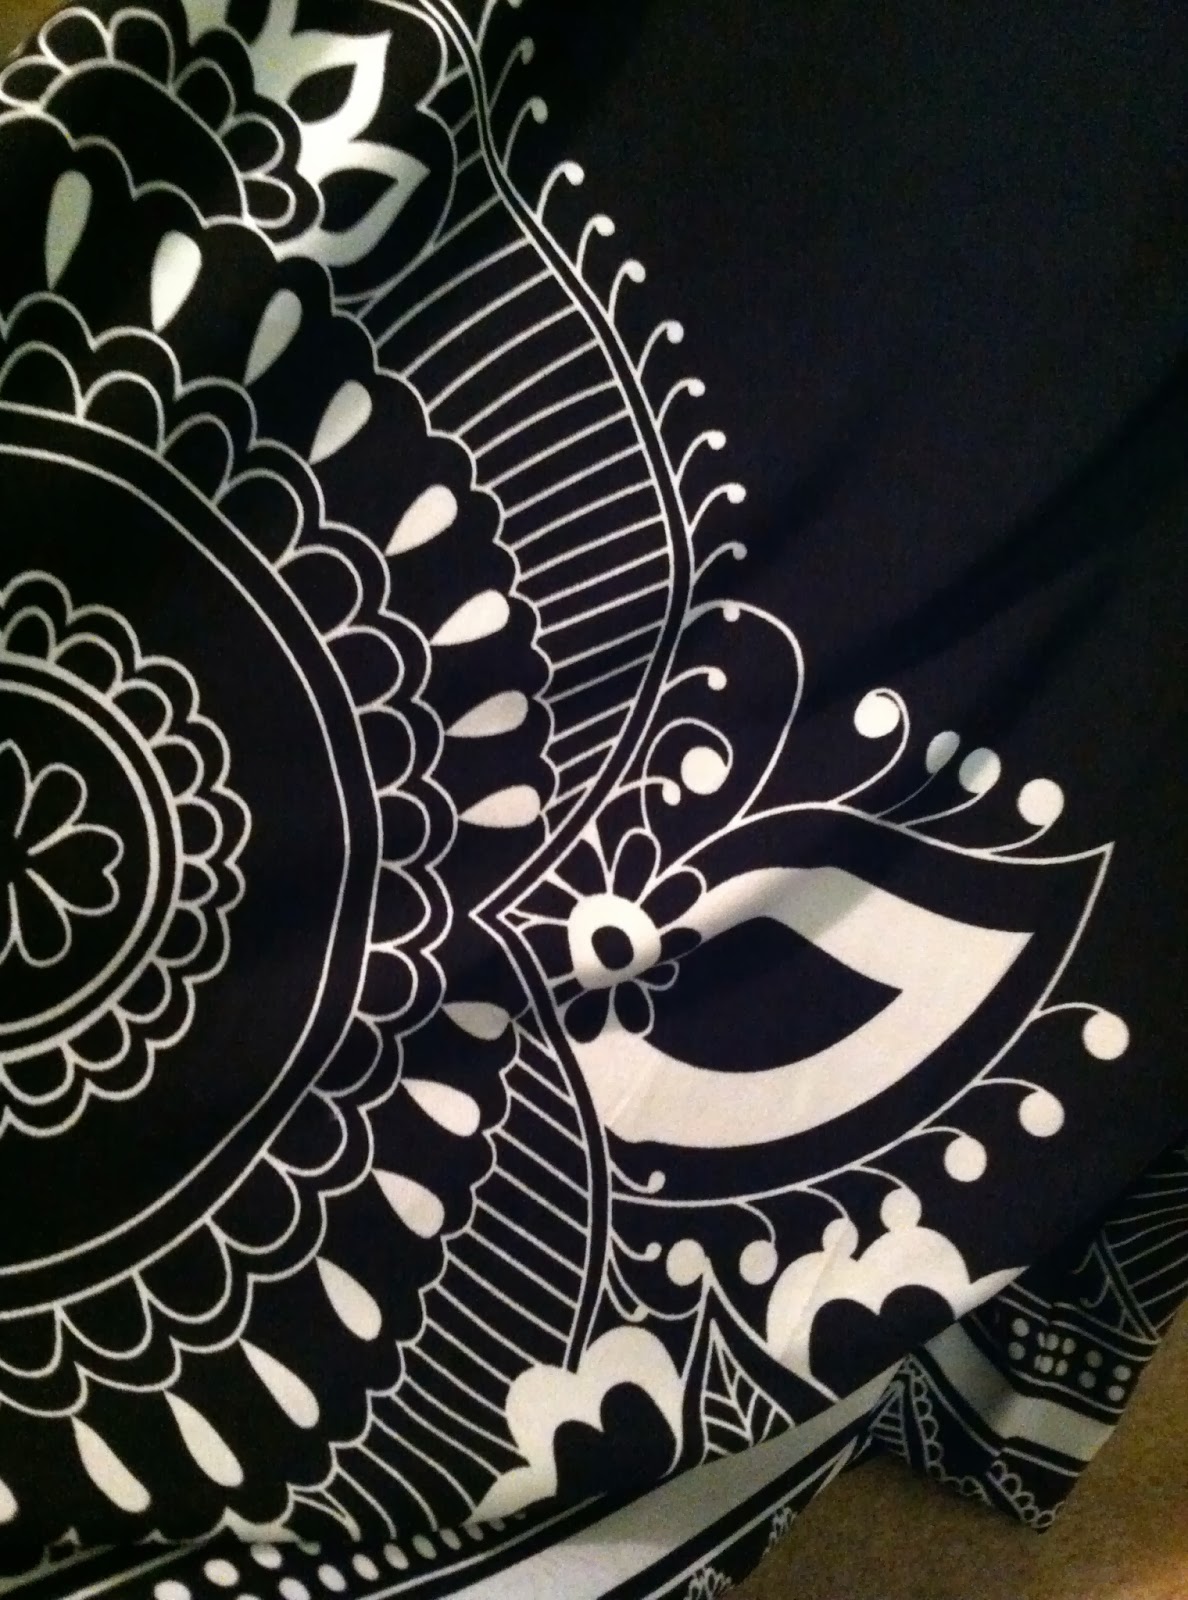
She brought me a shirt
With henna the possibilities are endless so when a friend brought me a shirt and asked me to create a design, I was excited. Free hand henna designs with inspiration from objects, is one of my favorite ways to do henna. If an object is not available I get inspiration from veins in the hands (sounds crazy, I know). This design was lots of fun, and this shirt was easy to get inspired by.
Can you see what I used from this shirt? What would you have done differently? What do you use for inspiration? Check out my instagram @freehandmehndi for daily inspiration


Can you see what I used from this shirt? What would you have done differently? What do you use for inspiration? Check out my instagram @freehandmehndi for daily inspiration



Tuesday, December 10, 2013
Floral Strip Fun
Floral strips have taken the henna design world by storm. While they've been around forever they've recently become more popular in bridal and special occasion henna. The awesome thing about floral strips is they're super easy to do, even for a beginner, and they look impressive when finished with very little effort.
Floral strips are made up of 3-4 shapes, accents, or motifs that are repeated until the design is complete. Below is a video of my most recent floral strip adventure. As you can see it took almost no time to complete and looks rather full.
Floral strips are fun for just about anywhere, the arm, hand, foot, leg, and even down the middle of the back.


Floral strips are made up of 3-4 shapes, accents, or motifs that are repeated until the design is complete. Below is a video of my most recent floral strip adventure. As you can see it took almost no time to complete and looks rather full.
Floral strips are fun for just about anywhere, the arm, hand, foot, leg, and even down the middle of the back.


Follow me on instagram@ freehandmehndi
Subscribe to me on youtube
and don't forget to visit me on Facebook
All images and video copyright Free Hand Mehndi
Monday, August 26, 2013
eBook Rerelease! Naqashat Moroccan Designs
So excited I was able to recover an ebook I thought was forever lost. Naqashat was the ebook that transitioned me from amateur ebook author to a pro. It took months for me to finish this ebook and it was a true labor of love. In this ebook are fusion designs and some traditional Moroccan pieces as well. I hope you enjoy it as much as I loved creating these patterns.
Naqashat is the word used to describe a traditional Moroccan Henna Artist.
Hip Hip Horay! Naqashat is back!


Naqashat includes 6 pages, 12 motifs, 2 hand patterns, and 4 foot patterns. Recommended for intermediate, but a nice challenge for beginners.
Naqashat is the word used to describe a traditional Moroccan Henna Artist.
Hip Hip Horay! Naqashat is back!


Naqashat includes 6 pages, 12 motifs, 2 hand patterns, and 4 foot patterns. Recommended for intermediate, but a nice challenge for beginners.
Naqashat is only $5 and can be purchased here
Friday, June 7, 2013
That crazy thing that Raj does

But Raj does some weird stuff. Ever used Raj on you palms and feet and found that it doesn't fade evenly? I mean dark spots for weeks upon weeks when the rest of the design is gone?

Raj is just crazy like that. Sometimes those dark spots turn blue or green, and look like mold. It isn't harmful at all, it's just one of those crazy things that Raj does. Of course this doesn't happen to everyone but for us lucky few it can attract some pretty odd stares.
This blog post was written in beautiful Irving park in Portland Oregon. Happy Friday!
Thursday, June 6, 2013
New tutorial! How to make a henna cone
The most popular method of henna application is by cone. In this video I show you how to fill and close your cone applicator. I also recently uploaded a video demonstrating how to roll a cone applicator. Cones are excellent applicators. Cones allow control with pressure, fine lines, shading, and draping.
Follow me at
Tuesday, June 4, 2013
10 Tips for an easier festival season **Two post Tuesday**

It's festival season, a busy season for henna artist. From trial and error I've developed a list of 10 tips that will make your festival season easier. Yes, it can be stressful and overwhelming.
1. Learn a bit about the festival you've applied to.
How was attendance the previous years? How far in advance is the event being promoted and how? Will you have competition (another henna artist)?
There's nothing more frustrating than vending at a festival that's not well attended, people were not aware there would be vendors, and vendors are stuck in an area where they're not visible. Doing your homework on an event can insure you'll have a successful money making day. A video on this topic alone is in the works.

2. Mix your henna in advance and test the batch.
There's nothing like getting to a festival and discovering that you should've sifted/strained your henna. Or finding out that the henna isn't staining well. Bring more henna then you think you need. There's nothing like running out if henna at a festival, I've had it happen and it sucks.
Festivals are not an opportunity to try new henna powders or paste mixtures. Stick to what you know, and use what has worked well for you in the past.
Avoid premixed henna cones, we don't always know what's in those cones. You can be liable if you apply chemicals to skin and a bad reaction occurs, even if you weren't aware the chemical was in the cone. As the artist you need to know what's in your henna.
3. Bring business cards and promotional materials.
I get a lot of repeat business from festivals. Make sure you have plenty of business cards on hand. Business cards should have your name/business name, phone and email, a line that includes the word henna, website/Facebook/Instagram ect. Examples of your work should be available online.

4. While applying the henna talk to your customer about aftercare and give them realistic expectations about the length of time their new body art will last.
If you have aftercare instruction sheets, give them to your customers but also talk to them about how to care for their new body art. The number one question I get is "So when can I wash this off?". Education is key. Be very clear about how long they should expect their new henna tattoo to last. If they want a henna tattoo on a part of the body that doesn't stain well, tell them. That tattoo not going to work on that part of the body? Let them know, you're the artist/expert after all.
5. Accept debit/credit cards. There are so many card readers on the market that are compatible with smart phones and tablets.
I personally use the square card reader and find it to be very user friendly. It will boost your sales too, especially for customers who don't carry cash, or have spent all of their cash.
6. Decorate your booth and make it look attractive.
You'll attract more customers. Nice table cloths, signs and banners, maybe a little ethnic decor, and keep a smile on your face. Dress in something comfortable and professional at the same time.
Having a clear idea of how you'd like to set up your booth in advance is always helpful. Be prepared for extreme changes in weather and bring a canopy.
7. Bring designs that take 5 minutes or less to apply.
Festivals usually are not the place to do 30 minute henna tattoos. Long tattoo application allows your line to get long, people get tired of waiting, people walk away, and you lose money. Some artist have clipboards where people can write their name instead of waiting in line, this doesn't prevent people from walking away. Remember, this is a business and you're there to make money.
This also isn't the time to try out new designs. Get familiar with your festival designs and know them well. If there are designs you struggle with or designs you don't like, don't bring them.

8. Make a list, check it twice, and pack two days in advance.
Are you a last minute packer like myself? I should probably take my own advice in this area. Packing last minute can leave you without essentials, under a lot of stress, and running late.
Festival organizers tend to be strict about load in/out times. Often there are street closures for festivals, show up late and you may have to cart you booth and supplies for several blocks.
Making a list will help you remember all of the essentials. I once forgot to bring henna to an event, how embarrassing.
Don't stress! Pack two days in advance and get plenty of rest the night before. Nothing like being sleep deprived on festival day.
9. Bring a booth babe!
A booth babe is a helper. The babe can help potential customers select designs, keep the booth organized and clean, and run quick errands. If your booth babe is also a henna artist her/his help during a rush of customers is invaluable.
I like to henna my booth babe, splash some glitter on her, and send her walking around the festival. This is a great way to get customers at festivals during slow periods, or at the very beginning before people have a chance to spend money on food. People will take notice of the booth babe and she directs them back to the henna booth to spend $$$.
10. Make a good impression.
Be confident in yourself and your skills. You are the artist/expert and people are excited to meet you. You are their ambassador to the world of henna, make it a positive experience. Enjoy yourself and make MONEY!
Monday, June 3, 2013
Quick and Easy Henna Paste
My quick and easy henna paste only requires the following; henna powder, lemon juice, and essential oil. Lemon juice bottled or fresh squeezed, either one works just fine. For essential oils I like to use eucalyptus (widely available and inexpensive), lavender (widely available, moderate cost), and tea tree oil (widely available but crazy expensive at times). You can add water or sugar to your paste if you like. I only add sugar when I am using a henna that is not naturally stringy. I typically use water when I mix henna from Morocco.
Please remember the idea is not to get perfect measurements, or exact measurements, that recipe does not exist. The idea is to get the right texture/consistency. The ideal consistency is toothpaste, mashed potatoes, or smooth peanut butter. If your henna paste is too thick and dry use more liquid. Too runny? Add more powder.

Video tutorial
Follow us on facebook
Show us some love on Instagram @freehandmehndi
Subscribe to us on youtube
Tuesday, May 28, 2013
Floral Strip Henna Motif **Two Post Tuesday**
Lucky you! On Tuesdays I feel generous and henceforth two post will appear. Henna doodling is one of my favorite past times. Doodling is also great for practicing techniques, trying out a new design or style, and testing the flow of your henna batch.

Have fun giving this henna floral strip motif a try. It's a fun piece for hands, feet, shoulder, arm band, tramp stamp, legs, you name it.
Follow us on Instagram @freehandmehndi for more inspiration.
Quick and Easy Henna Flower
Perfect for beginners, a quick and easy henna flower tutorial/pictorial. Five easy steps and three easy shapes to learn.


Saturday, May 25, 2013
Quick and Easy Henna Floral Strips
Floral strips are super easy and fun for all occasions. Perfect for henna parties, festivals, and sometimes simple bridal henna. Floral henna strips are a must have skill for any henna artist. They typically start with a simple swirl or paisley followed by repetitive curves, filler, and of course florals. Floral strips are usually made up of Indian style henna but you can also add Arabic and even gulf/khaleegy style elements to add a new and unique twist.
Floral strips can take anywhere from two minutes to ten minutes to apply depending on size, and level of difficulty. In videos to follow we will explore larger and more complex floral strips and implementing floral strips into other designs and styles of henna.
Please follow our blog and check us out on instagram.com @freehandmehndi and subscribe to our youtube channel @freehandmehndi


Floral strips can take anywhere from two minutes to ten minutes to apply depending on size, and level of difficulty. In videos to follow we will explore larger and more complex floral strips and implementing floral strips into other designs and styles of henna.
Please follow our blog and check us out on instagram.com @freehandmehndi and subscribe to our youtube channel @freehandmehndi


Subscribe to:
Posts (Atom)